PHP 使用 phpmailer 发送电子邮件
phpMailer 是一个非常强大的 php发送邮件类,可以设定发送邮件地址、回复地址、邮件主题、html网页,上传附件,并且使用起来非常方便。
phpMailer 的特点:
1、在邮件中包含多个 TO、CC、BCC 和 REPLY-TO。
2、平台应用广泛,支持的 SMTP 服务器包括 Sendmail、qmail、Postfix、Gmail、Imail、Exchange 等等。
3、支持嵌入图像,附件,HTML 邮件。
4、可靠的强大的调试功能。
5、支持 SMTP 认证。
6、自定义邮件头。
7、支持 8bit、base64、binary 和 quoted-printable 编码。
phpmailer 安装或者下载方式:
1、从 github 上下载: https://github.com/PHPMailer/PHPMailer/
2、使用 composer 安装:
composer require phpmailer/phpmailer
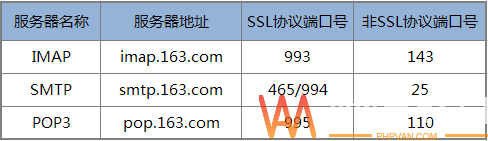
发送之前需要拥有自己的邮件服务器,测试的时候其实用自己申请的免费邮箱最方便了,不需要自己再搭建服务器了,可能要配置邮箱的SMTP服务,大部分公共邮箱(163、qq等)为了安全默认是关闭的。
网易邮箱配置如下图:
QQ 邮箱相关配置如下图:

如果是QQ企业邮箱的相关配置
SMTP服务器改成
smtp.exmail.qq.com(使用SSL,端口号465)
当然除了网易和 QQ 邮箱其他邮箱也是可以的,下面给出 php 代码示例:
<?php


namespace app\commom\sms;


use PHPMailer\PHPMailer\Exception;
use PHPMailer\PHPMailer\PHPMailer;
use think\facade\Cache;
use think\facade\Db;

class EmailSms
{
    private static $_instance = null;

    public $emailConfig = null; //邮箱配置

    /**
     * 私有构造方法 禁止外面实例化
     * AliSms constructor.
     */
    private function __construct()
    {
        $email = Db::name('config')->where('group', 'email')->select();
        foreach ($email as $v) {
            $this->emailConfig[$v['name']] = $v['value'];
        }
        /* [
          "email_host" => "SMTP服务器"
          "email_user_name" => "您使用的发送邮箱"
          "email_password" => "您的授权码"
          "email_port" => "端口号"
          "email_name" => "您的项目名称"
          "email_failure_time" => "验证码的有效时间"
        ] 以上是我数据库的配置*/
    }

    /**
     * 静态方法 单例模式的统一入口
     */
    public static function getInstance()
    {
        if (is_null(self::$_instance)) {
            self::$_instance = new self();
        }
        return self::$_instance;
    }

    /**
     * 发送邮箱验证码
     * User: jishubu
     * Date: 2021/1/21
     * time: 1:54 下午
     * @param string $email
     * @return bool
     * @throws \think\Exception
     */
    public function sendEmail(string $email)
    {
        $code = mt_rand(000000, 999999);
        try {
            $mail = new PHPMailer(true);
            $mail->CharSet = 'UTF-8';                                 //设定邮件编码
            $mail->SMTPDebug = 0;                                    // 调试模式输出
            $mail->isSMTP();                                        // 使用SMTP
            $mail->Host = $this->emailConfig['email_host'];        // SMTP服务器
            $mail->SMTPAuth = true;                               // 允许 SMTP 认证
            $mail->Username = $this->emailConfig['email_user_name'];                    // SMTP 用户名  即邮箱的用户名
            $mail->Password = $this->emailConfig['email_password'];                    // SMTP 密码  部分邮箱是授权码(例如163邮箱)
            $mail->SMTPSecure = 'ssl';                                                // 允许 TLS 或者ssl协议
            $mail->Port = $this->emailConfig['email_port'];                          // 服务器端口 25 或者465 具体要看邮箱服务器支持
            $mail->setFrom($this->emailConfig['email_user_name'], $this->emailConfig['email_name']);      //发件人
            $mail->addAddress($email);    // 收件人
            //$mail->addAddress('ellen@example.com');  // 可添加多个收件人
            $mail->addReplyTo($this->emailConfig['email_user_name']);     //回复的时候回复给哪个邮箱 建议和发件人一致

             //$mail->addCC('cc@example.com');                    //抄送
            //$mail->addBCC('bcc@example.com');                    //密送

            //发送附件
            // $mail->addAttachment('../xy.zip');         // 添加附件
            // $mail->addAttachment('../thumb-1.jpg', 'new.jpg');    // 发送附件并且重命名

            //Content
            $mail->isHTML(true);                                  // 是否以HTML文档格式发送  发送后客户端可直接显示对应HTML内容
            $mail->Subject = $this->emailConfig['email_name'] . '验证码';
            $mail->Body = '<h3>亲爱的(' . $this->emailConfig['email_name'] . '用户):</h3><br/>
                                  <p>您好!</p><br/>
                                  <P>您正在进行邮箱设置,5分钟内请在验证码输入框中输入: <b>' . $code . '</b>, 以完成操作,否则验证码将失效!</P><br/>
                                  <p>如果您没有进行此项操作,请忽略本邮件。</p><br/>';
            $mail->AltBody = '您的验证码是';
            $mail->send();
            Cache::set($email, $code, $this->emailConfig['email_failure_time']);
        } catch (Exception $e) {
            throw new \think\Exception($e->getMessage());
        }
        return true;
    }

    /**
     * 根据邮箱查询验证码是否正常
     * User: jishubu
     * Date: 2021/1/21
     * time: 1:23 下午
     * @param string|null $email
     * @return false|mixed
     */
    public function checkSmsIdentify(string $email = null)
    {
        if (!$email) {
            return false;
        }
        return Cache::get($email);
    }
}
以上是thinkphp框架的案例;
成功发送后的截图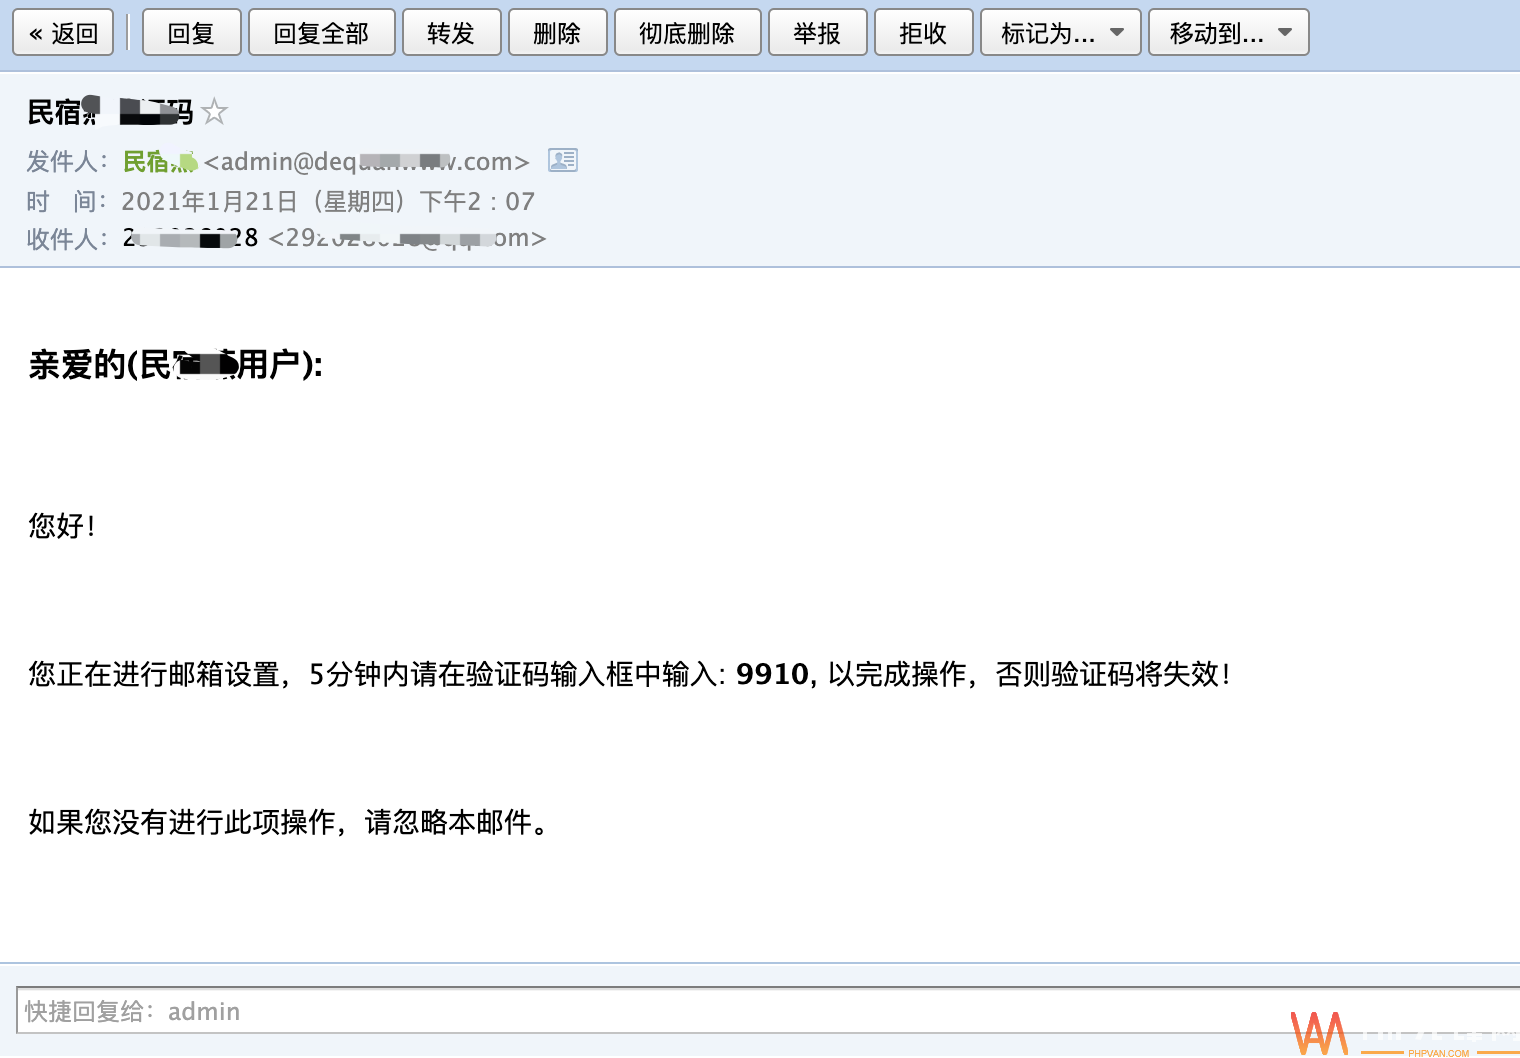
 上一篇
上一篇